The World is Flat Enough

Before we can move our camera in a 3D space, we need to define the world that we will be moving in.
It took me a while to decide how I wanted to represent the world in my game. At first, I wanted to keep the low-poly aesthetic from the 80s, but I also wanted to retain the “real world maps” feel used in the original games.
Eventually, I decided to go with a more “realistic” world and take advantage of the fact that we are no longer limited by 80s hardware. So, 3D semi-realistic it is.
There are multiple methods to generate 3D terrain, I chose to use a combination of a heightmap and a texture.
What is a Heightmap?⌗
A heightmap is a grayscale image where the brightness of each pixel represents the height of the terrain at that specific point.
Here is an example of a heightmap of the island of Sardinia:
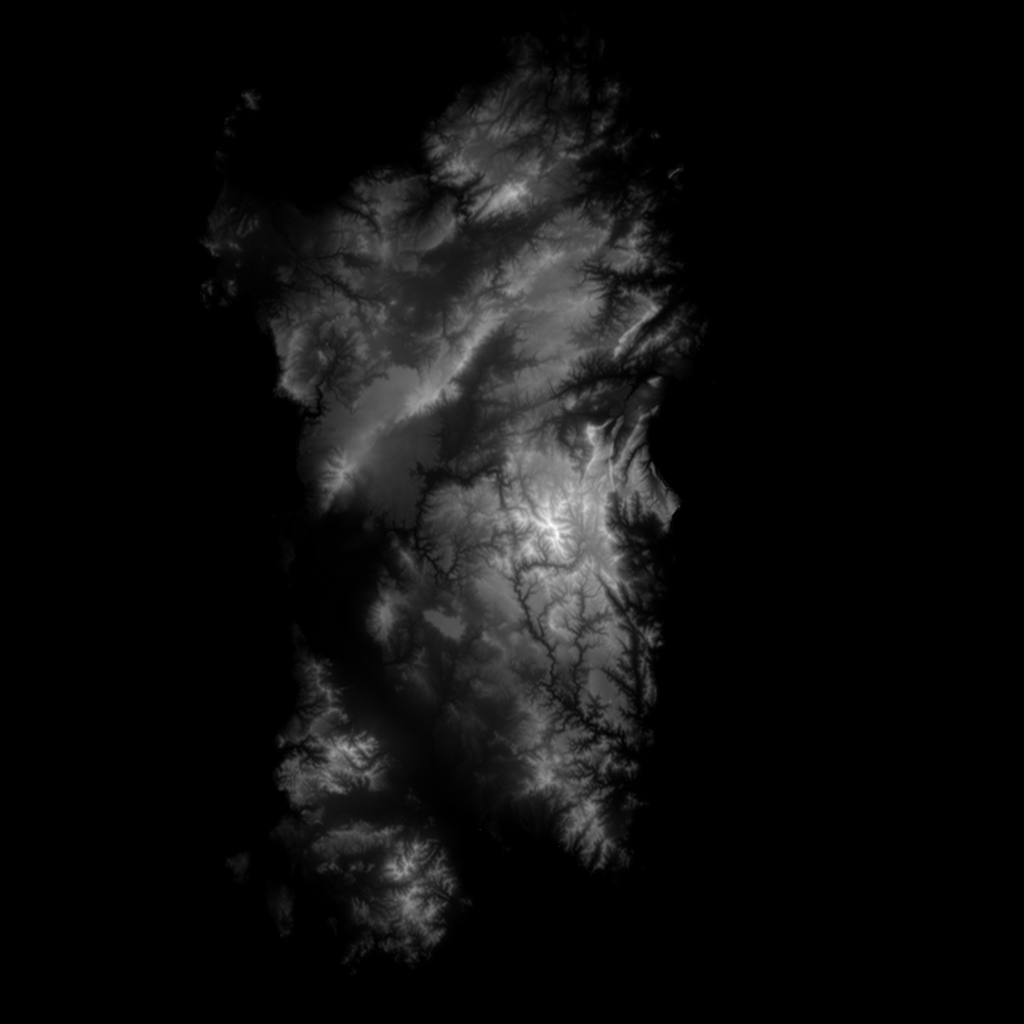
The black parts represent sea level, while the white parts represent the highest points on the island. Those beautiful fractal shapes are actually mountain ridges and river valleys.
Let’s convert this heightmap into a 3D terrain.
Heightmap to 3D: Step-by-Step⌗
First, we load the image:
Image image = LoadImage("heightmap.png");
Next, we want to create a heightmap mesh. raylib provides a handy function to do exactly that for us. We will create a mesh with the same dimensions as the heightmap, and the engine will use the brightness of each pixel to determine the Y-axis height of the terrain.
const auto terrainWidth = static_cast<float>(image.width);
const auto terrainLength = static_cast<float>(image.height);

Vector3 terrainSize = { terrainWidth, 600.0f, terrainLength };

Mesh mesh = GenMeshHeightmap(image, terrainSize);
A mesh is simply a collection of vertices, normals, and texture coordinates that define the shape of the terrain. We will use this mesh to create a model that we can actually render in our game.
Model model = LoadModelFromMesh(mesh);
In the main loop, we render the model using the DrawModel function:
BeginMode3D(camera);
    DrawGrid(10, 1.0f);
    DrawModel(model, (Vector3){0.0f, 0.0f, 0.0f}, 1.0f, WHITE);
EndMode3D();
The result is a 3D terrain. However, with no texture, it’s not looking very good just yet:
We can clearly see the spikes representing the mountains and the flat areas representing sea level.
But what happens if we take that same heightmap image and use it as a texture for the terrain? Let’s find out.
We start by re-using the heightmap image to generate a texture:
Texture2D texture = LoadTextureFromImage(image);
And then we apply this texture to the model’s material:
model.materials[0].maps[MATERIAL_MAP_DIFFUSE].texture = texture;
By the way, since the raw image data is no longer needed in the CPU memory, it is time to unload it:
UnloadImage(image);
In a later post, I’ll describe how I use RAII (Resource Acquisition Is Initialization) to automatically manage resources in my game. For now, let’s just remember to manually unload any resources we no longer need.
Let’s see the results:
From this result, it’s pretty obvious I chose an exaggerated number for the terrain’s height limit (it’s a bit too spiky!), but we can see the texture is successfully applied, and it already looks significantly better than before.
We will continue to improve and tweak the terrain in the next post.